Setting up an AMI-Based Edge Service in AWS
This article provides step-by-step instructions on setting up Secureworks® Taegis™ VDR-published AMIs for Edge Service setup in AWS.

ES Process AWS Post-Configured
Request a Configuration-only Edge Service in VDR ⫘
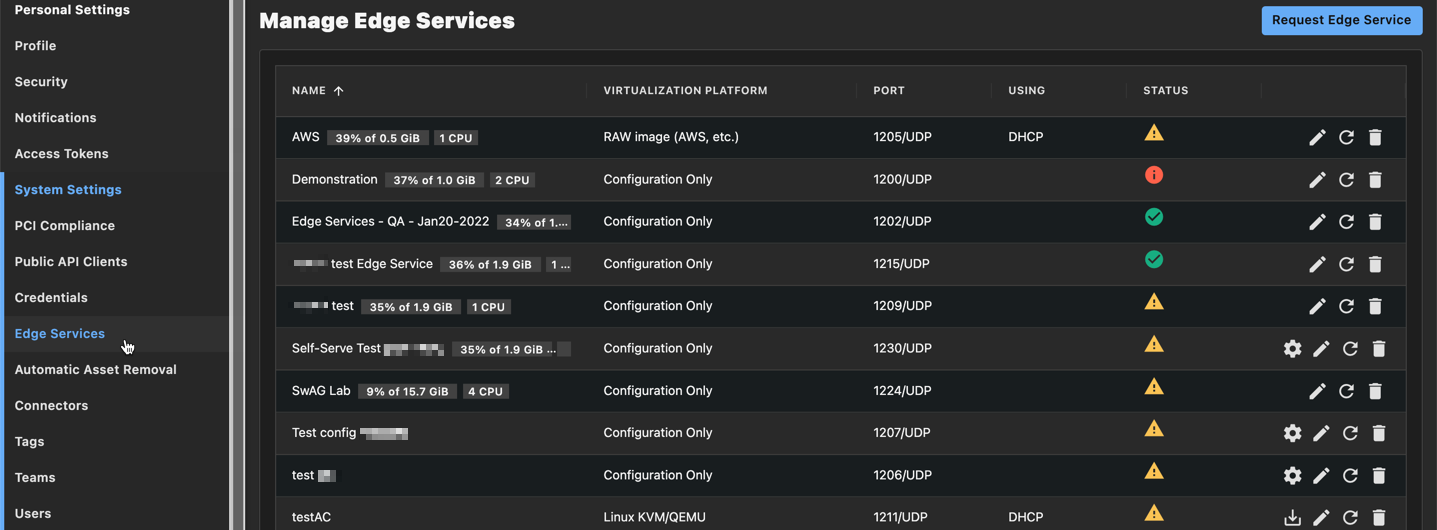
- To request the creation of a configuration-only URL for a generic Edge Service virtual machine, access the System menu by selecting the Account circle in the upper right, and then choose Settings.
- Select Edge Services from the System Settings box.

Manage Edge Services
-
In the Manage Edge Services panel displayed on the right, use the + button to request the creation of a new Edge Service.
-
From the window that appears, enter a name for the Edge Service, choose Configuration Only from the Virtualization Platform dropdown, and then select Submit.
-
After a few minutes, the configuration URL will be accessible through the cog icon that appears at the right of the Edge Service name.

Configuration URL icon
Tip
While the configuration URL is being generated, you can immediately note the AMI ID of a generic unconfigured Edge Service image that corresponds to your AWS region.
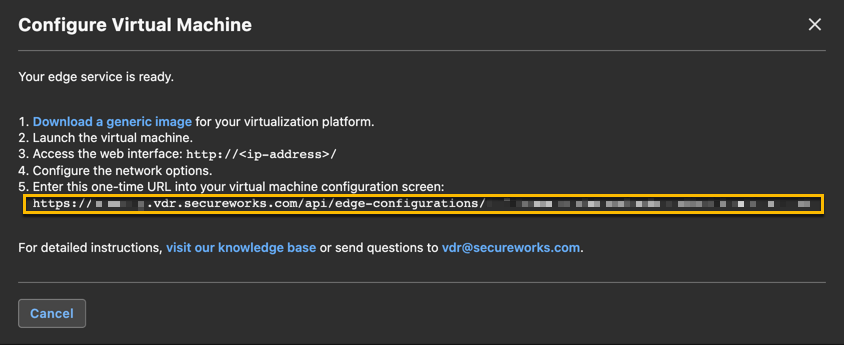
- Once the cog icon appears, select it to obtain further instructions and copy the Edge Service Configuration URL.

Edge Service Configuration URL
- Once the Edge Service has been created, VDR will wait for a connection from the Edge Service. The Status icon in the Manage Edge Services panel will stay orange when it isn't connected.

Edge Service Awaiting Connection
Get the Right AMI ID for Your AWS Region ⫘
With the configuration URL copied, note the AMI ID of a generic unconfigured Edge Service image that corresponds to your AWS region.
Set up a New Instance in AWS with This AMI ID ⫘
-
Select the appropriate AWS Region in your environment and navigate to your EC2 console.
-
Choose Launch Instance.

Launch Instance
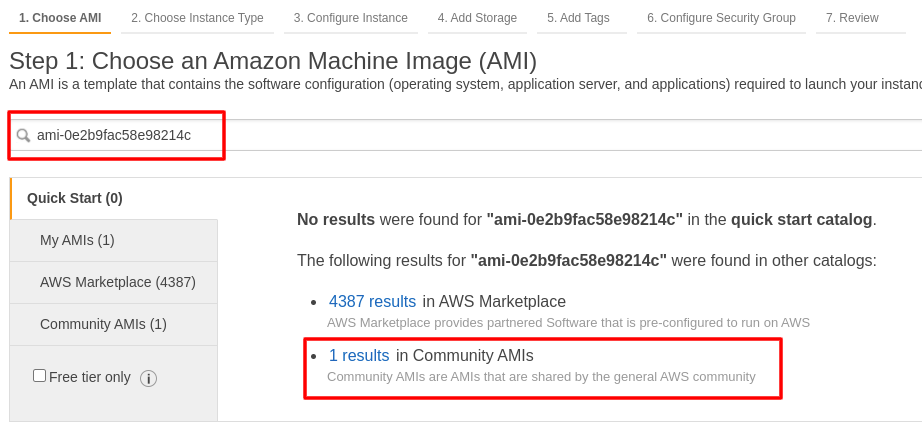
- In Step 1, search for the AMI ID noted above, and select the result from Community AMIs.

Community AMIs
-
When you select the result, you will be presented with the VDR Edge Service AMI information.
-
Choose Select to start the AMI creation process, then choose the instance size fitting with your deployment. We recommend at minimum a t2.small instance, but you can use the following guidelines for the instance size:
- t2.small: up to 100 scans/day
- t2.medium: between 100-200 scans/day
- t2.large: between 200-300 scans/day
- t2.xlarge: between 300-500 scans/day
- t2.2xlarge: 500+ scans/day
-
Configure instance details. These should be filled according to your VPC configuration, but these are the important settings to consider:
- Network / subnet: Choose a VPC where the ES will have access to the machines it needs to discover and scan.
- For the finalization of the setup and to link the generic ES that you started to your VDR instance, you need to have HTTP (port 80) access to the ES from your browser. This is only needed temporarily for the setup.
- Auto-assign Public IP: You will need to access the ES through HTTP (port 80) to finalize the setup and link the generic ES that you started to your VDR instance. Consider if you want to do this configuration through the Internet (secured through a security group restricting access to only your personal IP), or through a local jump-box in the same VPC.
-
Add storage. The default settings from the AMI (49GB SSD) should selected.
-
Add tags. You can add a Name tag if you want to be able to find your EC2 instance easily.
-
Configure security groups. Make sure you're setting the ES in a security group that allows:
- Access to the assets in the VPC where the discoveries and scans will take place.
- Access to the HTTP (port 80) interface for the ES from your browser to finalize the setup and link the generic ES that you started to your VDR instance. This is only needed temporarily for the setup.
-
Review and launch. If asked about installing a key by AWS, you can choose to proceed without a keypair.
-
Navigate back to your EC2 console to confirm that the ES is running; if you get a console screenshot, you should see that it’s waiting on the HTTP interface for final configuration step.
Assign an Elastic IP to the AMI ⫘
-
Navigate to Networking & Security>Elastic IPs.
-
Assign from one of your existing Elastic IPs; you can re-use one that you're not currently making use of.
- Right-click the image using it and select Dissassociate.
- Right-click your new ES image and select Associate → pick your IP → Associate.
-
Alternatively, you can request for more IPs from AWS's support, generally a request that is answered pretty quickly.
Use the Configuration URL to Finalize the Edge Service Setup ⫘
- The ES will expose a single-use temporary configuration interface that should be accessible on your local network (or publicly if you used an Amazon public IP) at the following address:
http://<IP-of-the-Edge-Service>/
Note
This temporary configuration interface will be automatically turned OFF as soon as the Edge Service is successfully configured.
If you need to change previous settings, you can always reset the AMI configuration and request a re-generation of a different configuration URL for the same Edge Service through the Regenerate icon in VDR.
![]()
Regenerate Icon
-
Once you have accessed the temporary configuration interface, select the desired local network configuration for the Edge Service, either DHCP or Static IP, and then select Submit.
-
On the next page, enter the configuration URL you obtained in VDR in Step 6 of the preceding section.
-
Once you press Submit, the Edge Service will download the custom keys in addition to the configuration it needs to run and will be associated to your VDR account.
Soon after, the success message Client keys were downloaded successfully displays and the web interface will be turned off immediately. If you chose a static IP configuration, the machine will reboot automatically; otherwise, for DHCP, you can just close the tab.
The machine console should now have changed and show connectivity to your VDR account.
Note
It can take a couple of minutes for the status message to change to connected properly.
Resolving Potential Connectivity Issues ⫘
Once your Edge Service is up and running, it should connect to VDR automatically if your networking has been configured accordingly.
The Edge Service icon visible in VDR will turn green if the connection is successful.
If you run into connectivity issues, you can try to debug by following these suggestions.
Tip
216.9.204.0/22 is our public IP range Internet scans originate from, and is also the range the ES connects to.
We recommend you safelist traffic to and from this subnet for your perimeter scans in order to ensure scan results consistency and to allow egress traffic from the ES to this IP range.
