Tenant Profile
Use Tenant Profile to manage information about your local infrastructure to inform Secureworks as they triage and review security alerts within XDR.
Tenant Profile information is recorded per tenant and can be accessed by selecting Tenant Settings from the left-hand side navigation and choosing Tenant Profile.
Note
Tenant Profiles are only available to Secureworks Managed Service Customers. Only Tenant Administrators can edit a Tenant Profile. For more information, see User Roles.
Tenant Profile contains four sections. Select a section title for further details on what information appears in that section and how it is used.
- Points of Contact lists key personnel to be contacted by Secureworks in the event of a critical security escalation.
- Network Ranges contains your internal network infrastructure.
- Network Information provides an overview of endpoint agents reporting to XDR and other tools that Secureworks may not have visibility into but should be aware of.
- Files is visible if Secureworks has uploaded files for your tenant and made them available to you to download.
Tip
To customize tables throughout Tenant Profile, see Filter and Rearrange Tables.
Points of Contact ⫘
Use Points of Contact to identify key contacts for Secureworks to reach out to in the event of a critical security escalation. A maximum of three contacts can be added to the escalation list.

Points of Contact
Add a Registered Tenant User ⫘
To add a registered tenant user as a point of contact, follow these steps:
- Select Tenant Settings from the left-hand side navigation and choose Tenant Profile. The Points of Contact table displays.
- Select Actions and choose Add Contact. The Critical Security Escalations Contact form displays.
-
In the Email Address field, choose to:
- Add yourself as a contact by selecting Assign to me from the drop-down.
- Add another tenant user by beginning to type the email address used when registering the user in XDR and then selecting it from the dynamically updated list of matching addresses.
-
Assign the desired Preference Level for the contact that reflects the order by which Secureworks will make contact in the event of a critical security escalation.
- The form populates with the user's relevant details. In order to be a part of the escalation profile, a user must have a primary phone number. While not mandatory for registration, this is required for an escalation contact.
Important
Adding or modifying phone numbers and names in this form also updates the user’s profile.
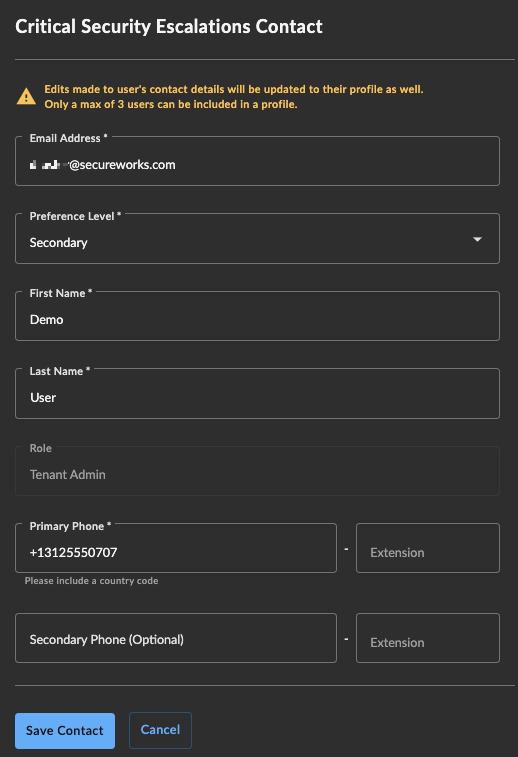
Add a Registered Tenant User
Important
The inclusion of a Country Code in the phone number field is required.
- Choose Save Contact to return to Points of Contact to add further contacts if required.
Add a Non-Registered Tenant User ⫘
You can add a contact that is not a registered XDR user as a point of contact, which allows for the use of a shared phone number in the escalation profile.
The group alias should not be a registered XDR user, as tracking user activity against this alias would become impossible and a security risk.
This phone contact-only user requires a telephone number, which could be a number that is shared amongst a support team for on-call issues.
Note
If you create a group contact to handle critical security escalations, we strongly advise that all members of the group have their own individual XDR accounts created to ensure access to the information necessary to investigate and troubleshoot.
To add a non-registered tenant user as a point of contact, follow these steps:
- Select Tenant Settings from the left-hand side navigation and choose Tenant Profile. The Points of Contact table displays.
- Select Actions and choose Add Contact. The Critical Security Escalations Contact form displays.
- In the Email Address field, enter the non-registered email address, which will not find a match.
- Select Assign external user as contact only from the drop-down.
Important
The email address required to add a non-registered user as a contact to the escalation profile is not used for security escalation. Only the provided phone number for the non-registered user is used.
- Assign the desired Preference Level for the contact that reflects the order by which Secureworks will make contact in the event of a critical security escalation.
- Enter the contact names, which may be a general description like IT Helpdesk that communicates to Secureworks what group is being contacted, and the phone number.
Note
Double check the phone number of non-registered users to ensure they are accurate for the escalation process.
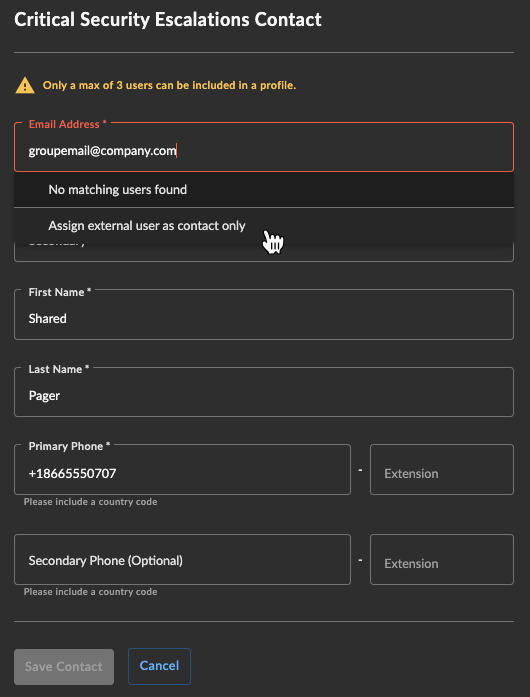
Add a Non-Registered Tenant User
- Select Save Contact to return to Points of Contact where non-registered users are identified as External in the User Type column.

Identify External User Type
Note
Editing or removing a non-registered user follows the same process as that of a registered user.
Edit a Contact ⫘
To edit an individual contact’s details or preference level, follow these steps:
- Select Tenant Settings from the left-hand side navigation and choose Tenant Profile. The Points of Contact table displays.
- Either select the entry in the Preferences column, or use the checkbox to the left of the row, select Actions, and choose Edit. The Critical Security Escalations Contact form displays.
- Edit the contact as desired and select Save Contact when complete.
Delete a Contact ⫘
To delete a contact from the security escalations list, follow these steps:
Note
This action deletes the user from the escalation list, not from accessing the tenant.
- Select Tenant Settings from the left-hand side navigation and choose Tenant Profile. The Points of Contact table displays.
- Either select the trash bin icon from the Actions column for the contact you wish to delete, or use the checkbox to the left of a row, select Actions, and choose Delete.
- Confirm your action by selecting Delete.
Export Contact List ⫘
To export the contact list to a CSV file, follow these steps:
- Select Tenant Settings from the left-hand side navigation and choose Tenant Profile. The Points of Contact table displays.
- Select Actions and choose Export All as CSV and the file automatically downloads.
Network Ranges ⫘
Secureworks uses the network information you provide to identify whether the source of some activity is occurring from within your network. This is useful for triaging netflow-based detections, and so the more information you provide, the better and more accurate this triage process can become.
To access Network Ranges, select Tenant Settings from the left-hand side navigation, choose Tenant Profile, and select the Network Ranges tab.
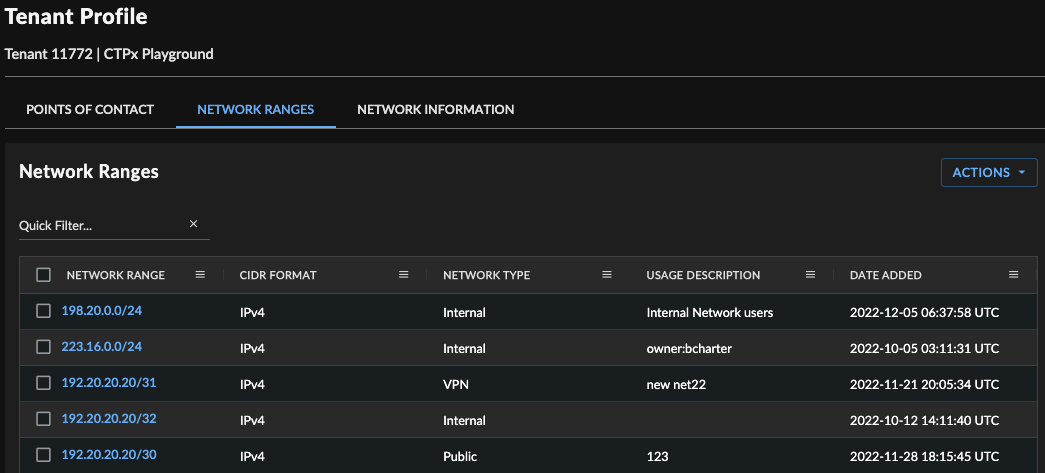
Network Ranges
The Network Ranges table displays the range, format, type, and description of the network. The audit fields display who added the range and when it was added for tracking purposes.
Add a Network Range ⫘
To add a network range, follow these steps:
- Select Tenant Settings from the left-hand side navigation, choose Tenant Profile, and select the Network Ranges tab. The Network Ranges table displays.
- Select Actions and choose Add New Range. The Network Range form displays.
- Select the Network Type from the drop-down and then enter the Range Value in IPv4 or IPv6 format.
Note
If a single IP address is entered with no subnet defined, a /32 subnet is applied to the address to indicate a single IP.
- Enter further details in the Usage Description box. This may be a location or use of the range, or more details about the type of network if you selected Other as the Network Type.
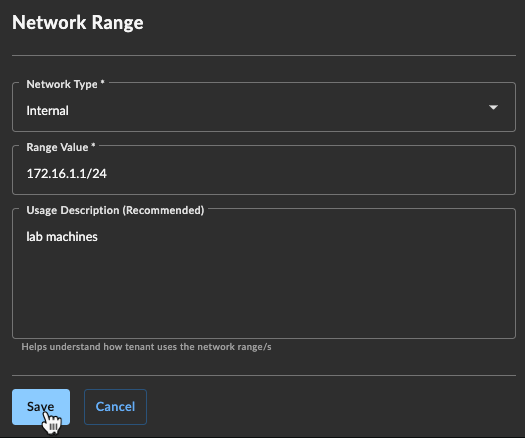
Add a Network Range
- Select Save to return to the Network Ranges table where the newly added range appears at the bottom of the list.
Edit a Network Range ⫘
To edit a network’s range details or IP information, follow these steps:
- Select Tenant Settings from the left-hand side navigation, choose Tenant Profile, and select the Network Ranges tab. The Network Ranges table displays.
- Either select the entry in the Network Range column, or use the checkbox at the left of a row, select Actions, and choose Edit. The Network Range form displays.
- Edit the network range as desired and select Save when complete.
Note
You can only edit a single network range at a time.
Delete a Network Range ⫘
To delete one or more network ranges, follow these steps:
- Select Tenant Settings from the left-hand side navigation, choose Tenant Profile, and select the Network Ranges tab. The Network Ranges table displays.
- Select one or more network ranges you wish to delete using the checkboxes at the left of the rows.
- Select Actions and choose Delete.
- Confirm your action by selecting Delete.
Export Network Range List ⫘
To export the network range list to a CSV file, follow these steps:
- Select Tenant Settings from the left-hand side navigation, choose Tenant Profile, and select the Network Ranges tab. The Network Ranges table displays.
- Choose one of the following options:
- To export the full list, select Actions and choose Export All as CSV.
- To export a subset of the list, use the checkboxes at the left of the rows to select the desired ranges, select Actions, and then choose Export Selected as CSV.
Quick Filter ⫘
Use the Quick Filter search function above the table to filter the network ranges to a particular subset to edit or review. Type a string to search for, which matches across all network ranges, not just those currently displayed, and searches through all fields.
In the following example, the table has been filtered so only internal network type ranges are displayed.

Network Ranges Quick Filter
Network Information ⫘
Network Information provides further details of key assets and configurations within your network to aid Secureworks when reviewing events and alerts from your environment.
To access Network Information, select Tenant Settings from the left-hand side navigation, choose Tenant Profile, and select the Network Information tab.
Network Information contains three tables of data: Endpoint Agents; Security Controls; and Administration, Access, and MFA.
Endpoint Agents ⫘

Endpoint Agents
The Endpoint Agents table lists the agents deployed and configured to report to XDR, providing a high-level summary of your environment and the scope of software in use to monitor those endpoints.
Some agents provide different data or data in varying formats, so it is useful to Secureworks to understand what is in use when investigating activity. This is also invaluable information when threat hunts are being designed and conducted, as the hunts have to be formatted differently depending on the agents in use.
It is also valuable to you to see and understand the scope of devices that are covered within XDR across the disparate agents that may be implemented.
Security Controls ⫘

Security Controls
The Security Controls table lists services or tools that may exist in your environment that Secureworks may not have visibility into but should be aware of when performing a security review.
This information helps to identify items such as authorized scanners in your environment that may trigger countermeasures to fire.
Add a Security Control ⫘
To add a security control device or appliance from your network not related to XDR that Secureworks should be aware of, follow these steps:
- Select Tenant Settings from the left-hand side navigation, choose Tenant Profile, and select the Network Information tab.
- In the Security Controls section, select Actions above the table and choose Add New Security Control. The Security Control form displays.
- Enter the IP address or range, choose the Service Type, and choose the Source.
- Enter further details in the Additional Details box. This may be more granular information about the security control, or more details about the security type if you selected Other.
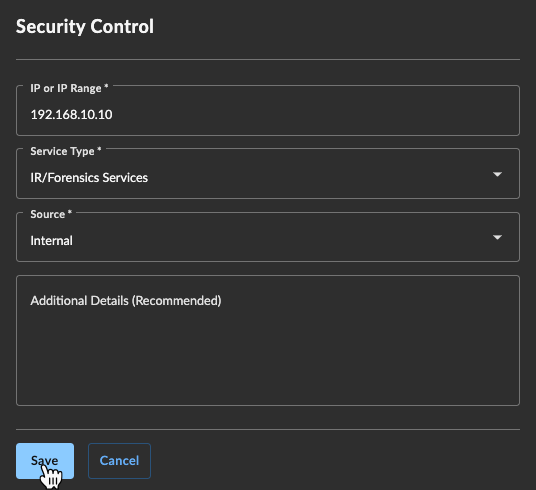
Add Security Control
- Select Save to add this to the list and return to Network Information.
Edit a Security Control ⫘
To edit a security control, follow these steps:
- Select Tenant Settings from the left-hand side navigation, choose Tenant Profile, and select the Network Information tab.
- In the Security Controls section, either select the entry in the IP column for the security control you wish to edit, or use the checkbox at the left of a row, select Actions above the table, and choose Edit Selected Control. The Security Control form displays.
- Edit the security control as desired and select Save when complete.
Note
You can only edit a single security control at a time.
Delete a Security Control ⫘
To delete one or more security controls, follow these steps:
- Select Tenant Settings from the left-hand side navigation, choose Tenant Profile, and select the Network Information tab.
- In the Security Controls section, select one or more security controls you wish to delete using the checkboxes at the left of the rows.
- Select Actions and choose Delete.
- Confirm your action by selecting Delete.
Export Security Controls ⫘
To export the security controls list to a CSV file, follow these steps:
- Select Tenant Settings from the left-hand side navigation, choose Tenant Profile, and select the Network Information tab.
- In the Security Controls section, choose one of the following options:
- To export the full list, select Actions and choose Export All as CSV.
- To export a subset of the list, use the checkboxes at the left of the table to select the desired security controls, select Actions, and then choose Export Selected as CSV.
Quick Filter ⫘
Use the Quick Filter search function above the table to filter the security controls list to a particular subset to edit or review. Type a string to search for, which matches across all security controls, not just those currently displayed, and searches through all fields.
In the following example, the table has been filtered so all IDS/IPS type controls are displayed.

Security Controls Quick Filter
Administration, Access, and MFA ⫘

Administration, Access, and MFA
When Secureworks triages authentication- or user-based detections, the information in the Administration, Access, and MFA table is critical to help identify the surrounding activity for internet-facing services.
Use this section to add details of MFA services like authentication information relating to an internet-facing service within your organization.
Add an Administration, Access, and MFA Service ⫘
To add an MFA service , follow these steps:
- Select Tenant Settings from the left-hand side navigation, choose Tenant Profile, and select the Network Information tab.
- In the Administration, Access, and MFA section, select Actions above the table and choose Add New MFA. The New MFA form displays.
- Enter the IP address or range, choose the Service Type, select if MFA is required, and enter details of any MFA exceptions.
- Enter further details in the Additional Details box. This may be more granular information about the service, or more details about the service type if you selected Other.
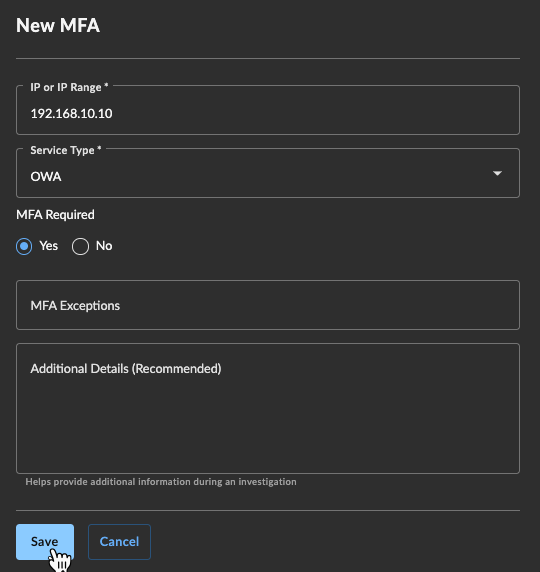
Add MFA Service
- Select Save to add this to the list and return to Network Information.
Edit an Administration, Access, and MFA Service ⫘
To edit an MFA service, follow these steps:
- Select Tenant Settings from the left-hand side navigation, choose Tenant Profile, and select the Network Information tab.
- In the Administration, Access, and MFA section, either select the entry in the IP column for the the service you wish to edit, or use the checkbox at the left of a row, select Actions above the table, and choose Edit Selected MFA. The Edit MFA form displays.
- Edit the service as desired and select Save when complete.
Note
You can only edit a single security control at a time.
Delete an Administration, Access, and MFA Service ⫘
To delete one or more MFA services, follow these steps:
- Select Tenant Settings from the left-hand side navigation, choose Tenant Profile, and select the Network Information tab.
- In the Administration, Access, and MFA section, select one or more services you wish to delete using the checkboxes at the left of the rows.
- Select Actions and choose Delete.
- Confirm your action by selecting Delete.
Export Administration, Access, and MFA List ⫘
To export the MFA list, follow these steps:
- Select Tenant Settings from the left-hand side navigation, choose Tenant Profile, and select the Network Information tab.
- In the Administration, Access, and MFA section, choose one of the following options:
- To export the full list, select Actions and choose Export All as CSV.
- To export a subset of the list, use the checkboxes at the left of the table to select the desired services, select Actions, and then choose Export Selected as CSV.
Quick Filter ⫘
Use the Quick Filter search function above the table to filter the MFA services list to a particular subset to edit or review. Type a string to search for, which matches across all services, not just those currently displayed, and searches through all fields.
In the following example, the table has been filtered so all VPN service types are displayed.

MFA Quick Filter
Files ⫘
The Files tab contains files that Secureworks has uploaded for your tenant and made available to you to download, such as a network diagram. Files cannot currently be uploaded or edited by tenant users.
To download a file, follow these steps:
- Select Tenant Settings from the left-hand side navigation, choose Tenant Profile, and select the Files tab.
- Select the File Name for the file you wish to download, or use the checkbox to the left of the file and choose Download from the Actions menu. Your file downloads automatically.
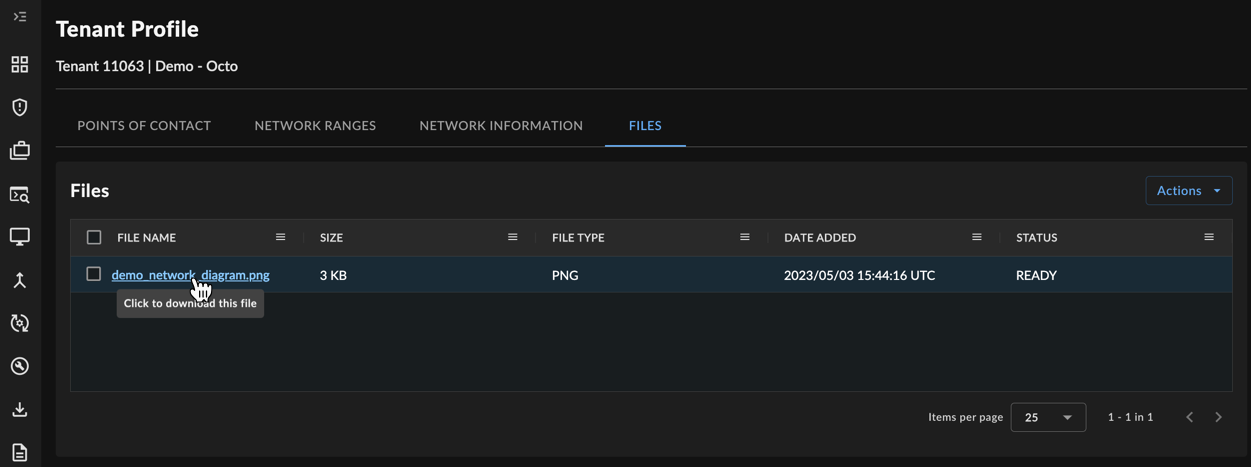
Download File
Filter and Rearrange Tables ⫘
Tables throughout Tenant Profile include the following controls to filter and rearrange data:
Column Menu ⫘
Open the menu for available columns in the table by selecting the menu icon to the right of the column name.
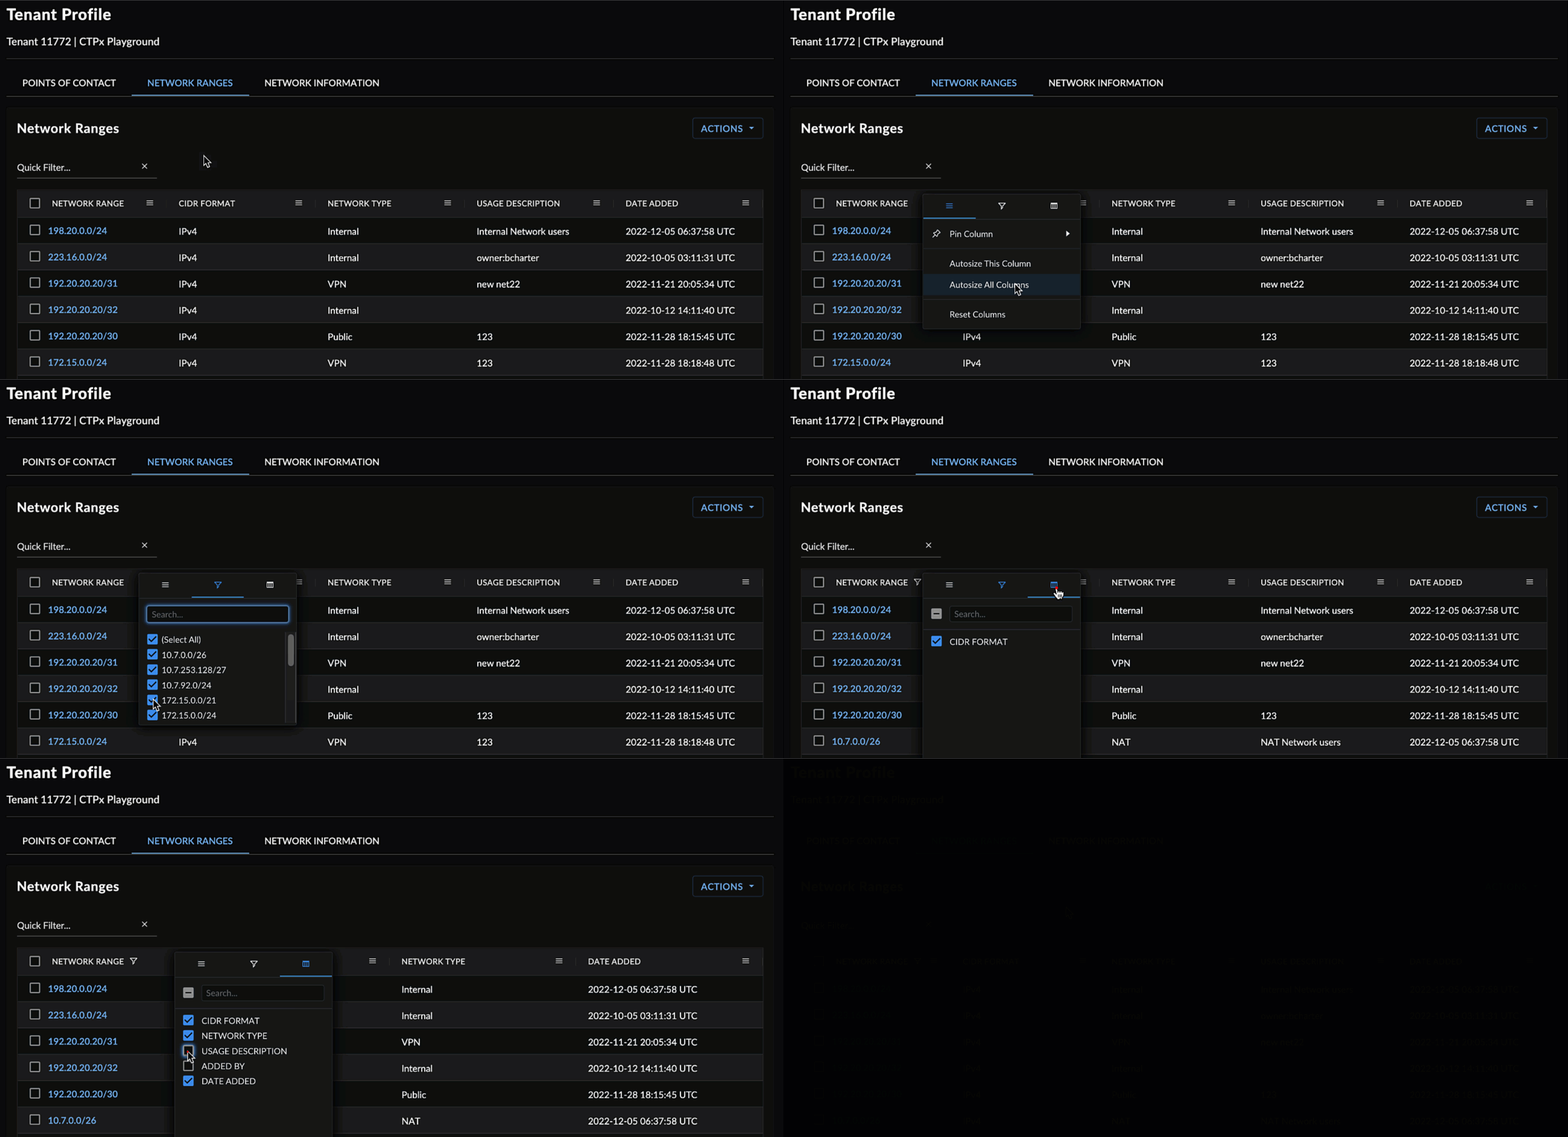
Tenant Profile Column Menu
Column Filter ⫘
Open a column menu and select the filter icon. The table updates results as you enter text in the column filter. Alternatively, use the checkmarks to filter by grouped field values, where available.

Filter a Column
Pin a Column ⫘
You can pin a column to the left or right of the table. To do so, open the menu for the column you would like to pin by selecting the hamburger icon, select Pin Column, and then choose which side you would like to pin the column to.

Pin a Column
Autosize Columns ⫘
Clean up the table appearance using the autosize column features. This helps show obscured information when a column is too narrow.
-
Choose Autosize This Column to adjust the size of only the selected column.
-
Choose Autosize All Columns to adjust the size of all visible columns.

Autosize Columns
Choose Columns to Display ⫘
Choose which columns you want to appear in the table by opening a column menu, selecting the columns icon, and checking or unchecking the desired columns.
Use the text box to quickly filter for column names.

Select Displayed Columns
Arrange Columns ⫘
Drag and drop columns by the header to rearrange them.
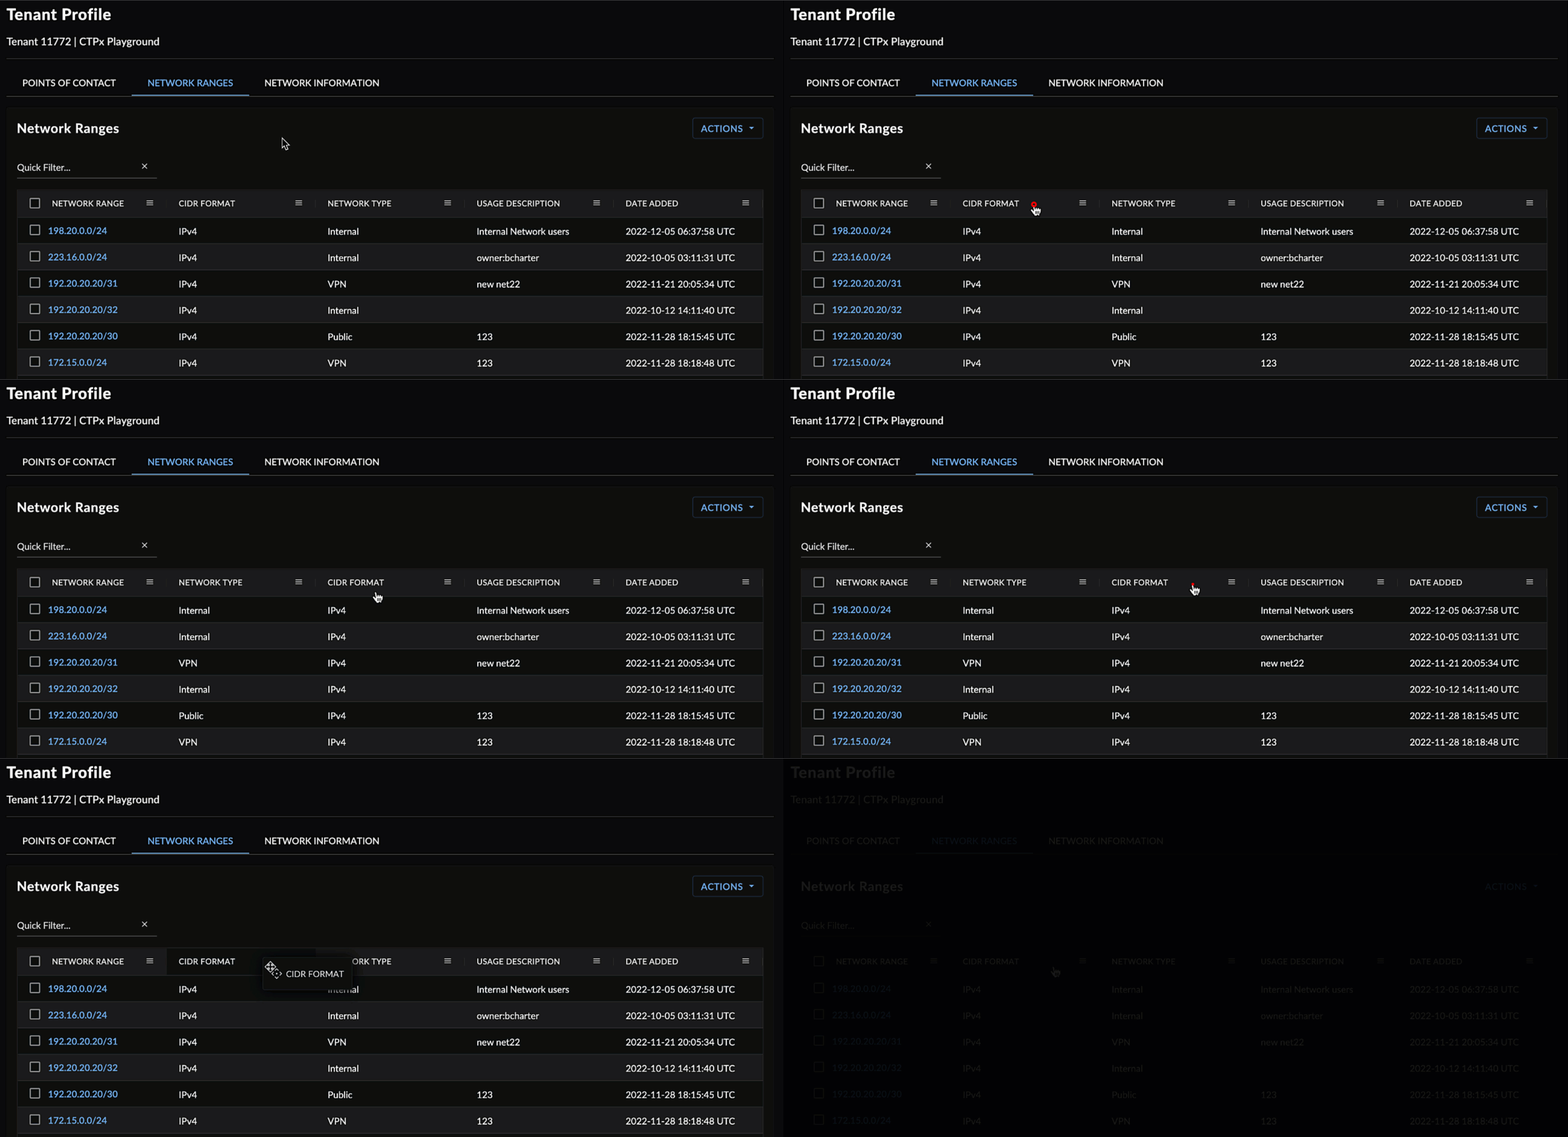
Rearrange Columns
Reset Columns ⫘
To reset the columns of a table to their default size and ordering, select Reset Columns from a column menu.

Reset Columns
