F5 ASM WAF Integration Guide
F5 Networks Application Security Manager (ASM) Web Application Firewall (WAF) must be configured to send logs via syslog to the Taegis™ XDR Collector. WAF logs are filtered and correlated in real time for various security event observations.
Firewall Requirements ⫘
| Source | Destination | Port/Protocol |
|---|---|---|
| F5 BIG-IP Appliance | XDR Collector (mgmt IP) | TCP/601 |
Data Provided from Integrations ⫘
| Auth | CloudAudit | DNS | HTTP | Management | Netflow | NIDS | Process | Thirdparty | |
|---|---|---|---|---|---|---|---|---|---|
| F5 ASM WAF | D |
Y = Normalized | D = Out-of-the-Box Detections | V = Vendor-Specific Detections
Note
XDR detectors are not guaranteed to be triggered, even if a data source's logs are normalized to a schema associated with a given detector. However, you can create Custom Alert Rules to generate alerts based on normalized data from a data source.
Logging Configuration Instructions ⫘
Pre-Version 11.3 ASM ⫘
Note
F5 Version 11.3 introduced some changes, and configuration instructions for ’pre 11.3’ and ’11.3 and higher’ are different. Ensure you are following the correct instructions for the version of your F5.
Configuring Logging Profiles for ASM ⫘
Accessing the Logging Profiles ⫘
To access the logging profiles:
- From the F5 welcome screen, open Application Security > Options > Logging Profiles.
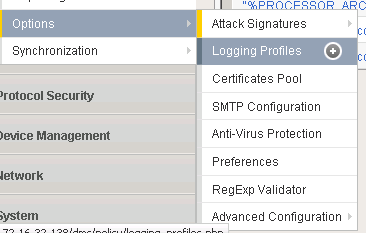
Step 1. Open Logging Profiles.
- The Logging Profiles page is displayed. Note that Log all requests, Log illegal requests, and No logging profiles are the default system-created logging profiles.
Creating New Logging Profiles ⫘
To create new logging profiles:
- From the Logging Profiles page, click Create. A form is displayed.

Step 1. Click Create.
- Select Advanced from the Configuration drop-down menu. The form updates to include advanced fields.

Step 2. Select Advanced.
-
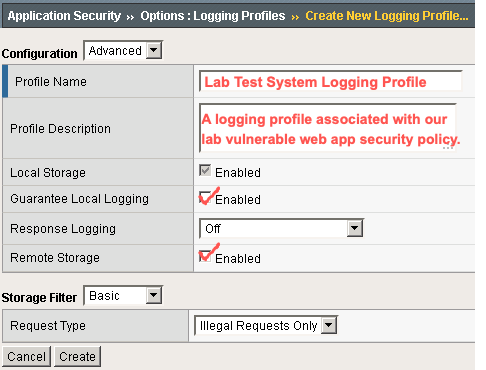
Complete the following fields:
- Profile Name — The name of the logging profile, including the name of the web application it is associated with
- Profile Description — A description of the profile
- Guarantee Local Logging — Select Enabled to ensure that all event logs are stored locally on F5 ASM before being sent to a remote syslog destination
- Response Logging — Select Off
- Storage Filter — Select Basic
- Request Type — Select Illegal Requests Only
- Maximum Entry Length — Select 64K
- Report Detected Anomalies — Select Enabled
- Remote Storage — Select Enabled. Additional remote logging fields appear:
- Remote Storage Type — Select Remote
- Protocol — Select TCP
- IP Address — The IP address of the XDR Collector. Click Add after entering the IP address to add it to the list of remote server addresses.
- Port — Enter 601
- Facility — Select LOG_LOCAL_5
- Storage Format — Select Predefined and change the CSV with delimiter to a pipe (
|). Then move the following Available Items to the Selected Items list in this exact order:- date_time
- unit_hostname
- policy_name
- method
- ip_client
- src port
- x_forwarded-for_header-value
- uri
- response_code
- http_class_name
- attack_type
- violations
- sub_violations
- sig_names
- sig_ids
- protocol
- severity
- request_status
- request
- support id
- dest_id
- dest_port
Note
It’s crucial to select these items in the order defined above, as this determines what information is populated in F5 ASM alerts to the logging device, and in what order.
Tip
You can bulk select items by holding the control key while selecting the placeholders in the Available items column. However, note that the items will move over alphabetically, and must be reordered using the Up and Down buttons.
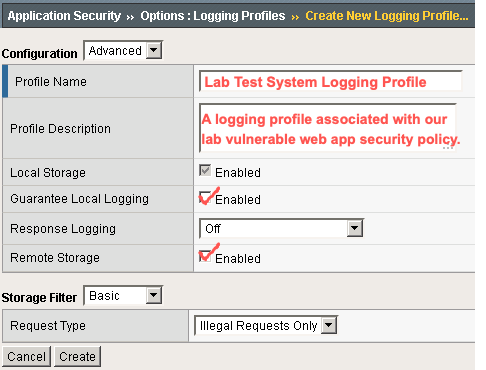
Step 3. Complete Logging Profile Fields.

Step 3. Complete Logging Profile Fields.
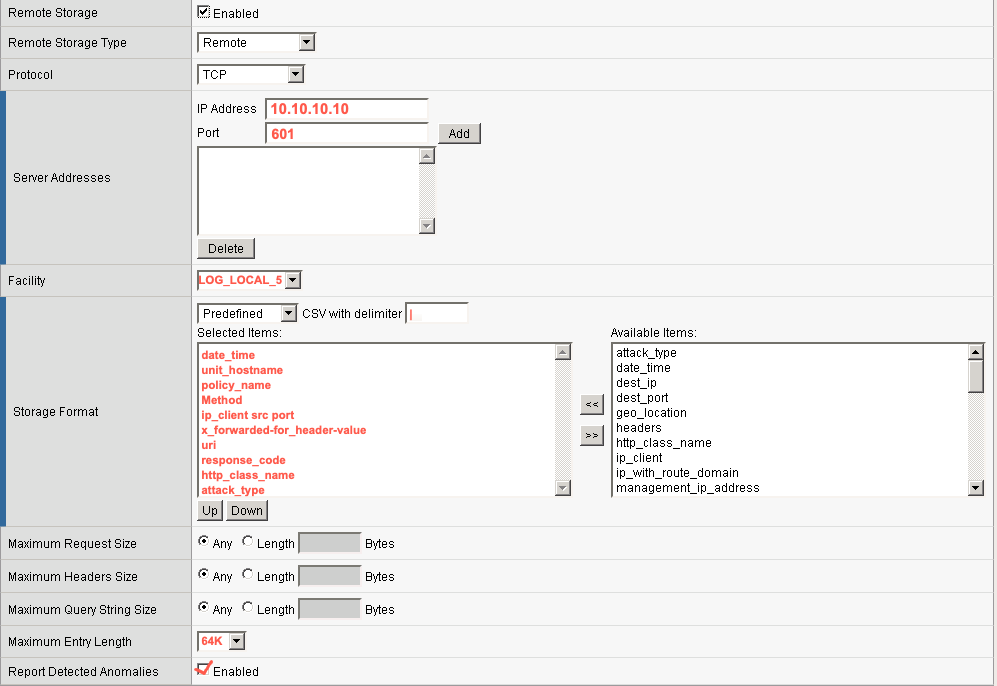
Step 3. Complete Logging Profile Fields.
- Click Create.

Step 4. Create.
- The new logging profile is created and available from the Logging Profiles screen.

Step 5. Created Logging Profile.
Associating Logging Profiles with ASM Security Policies ⫘
An ASM logging profile does not automatically send events to a remote destination; it must first be associated with a security policy in order for the ASM to determine which events to associate with the logging profile. These steps describe how to associate the profiles and policies.
To associate a logging profile with the policy:
- From the F5 welcome screen, select Application Security > Security Policies.
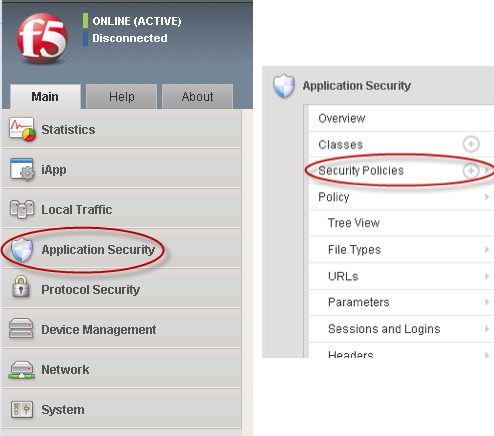
Step 1. Open Security Policies.
- The Active Security Policies page is displayed.

Step 2. Active Security Policies.
- Select the name of the policy you want to associate with a logging profile. The Policy Properties page is displayed.
- Under Logging Profile, select the logging profile you want to associate with the security policy.
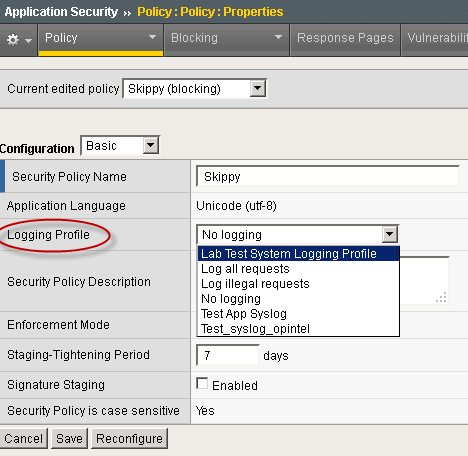
Step 4. Select Logging Profile.
- Select Save.
- A notification appears stating that the changes have not been applied yet. Select Apply Policy to make the changes live.
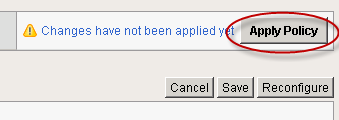
Step 6. Apply Policy.
System Logging Configuration ⫘
To configure the system logging:
- From the F5 welcome screen, open System > Logs > Configuration > Remote Logging.
- The Remote Logging Properties window is displayed.
- Complete the following fields:
- Remote IP — The IP address of the XDR Collector
- Remote Port — Enter 601
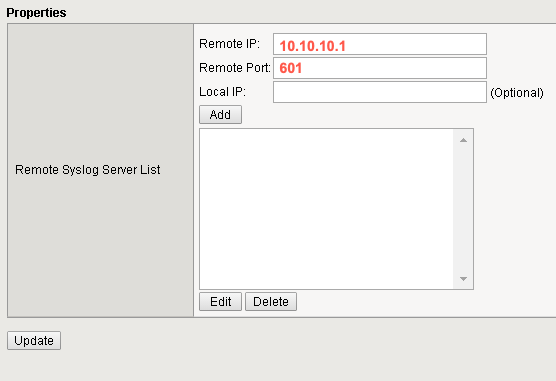
Step 3. Edit Remote Logging Properties.
- Select Add to add the information to the list.
- Select Update to save these changes.
Once these steps are completed, the device is ready to send events to the XDR Collector.
Version 11.3+ ASM ⫘
Note
F5 Version 11.3 introduced some changes, and configuration instructions for ’pre 11.3’ and ’11.3 and higher’ are different. Ensure you are following the correct instructions for the version of your F5.
Define your protected web applications below by their Security Policy Name (application name).
| Web Application Name | Description |
|---|---|
| example_website | Example Company Main Website |
Configuring Logging Profiles for ASM ⫘
Accessing the Logging Profiles ⫘
To access the logging profiles:
- From the F5 welcome screen, open Security > Event Logs > Logging Profiles.
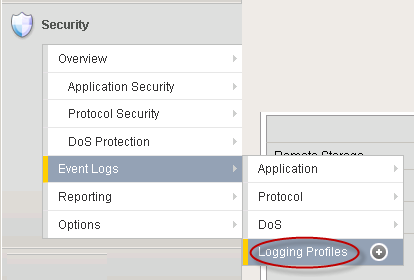
Step 1. Open Logging Profiles.
- The Logging Profiles page is displayed. Note that Log all requests, Log illegal requests, and No logging profiles are the default system-created logging profiles.
Creating New Logging Profiles ⫘
To create new logging profiles:
- From the Logging Profiles page, click Create. A form is displayed.

Step 1. Click Logging Profile.
- Select Advanced from the Configuration drop-down menu. The form updates to include advanced fields.

Step 1. Select Advanced.
-
Complete the following fields:
- Profile Name — The name of the logging profile, including the name of the web application it is associated with
- Profile Description — A description of the profile
- Guarantee Local Logging — Select Enabled to ensure that all event logs are stored locally on F5 ASM before being sent to a remote syslog destination
- Response Logging — Select Off
- Storage Filter — Select Basic
- Request Type — Select Illegal Requests Only
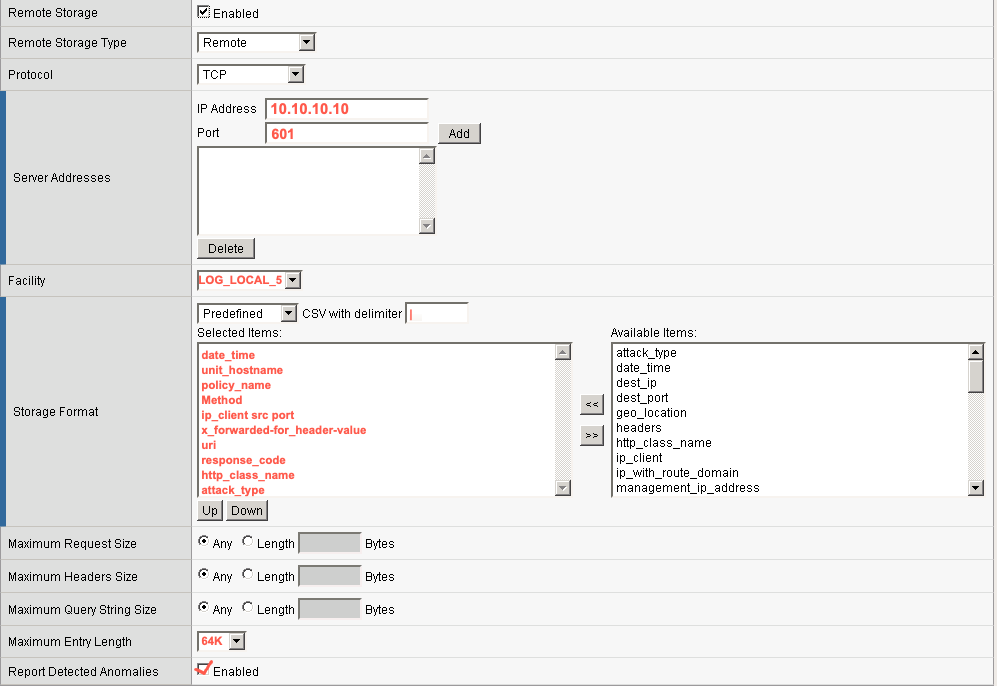
- Maximum Entry Length — Select 64K**
- Report Detected Anomalies — Select Enabled**
- Remote Storage — Select Enabled. Additional remote logging fields appear:
- Remote Storage Type — Select Remote
- Protocol — Select TCP
- IP Address — The IP address of the XDR Collector. Click Add after entering the IP address to add it to the list of remote server addresses.
- Port — Enter 601
- Facility — Select LOG_LOCAL_5
- Storage Format — Select Predefined and change the CSV with delimiter to a pipe (
|). Then move the following Available Items to the Selected Items list in this exact order:- date_time
- unit_hostname
- policy_name
- method
- ip_client
- src port
- x_forwarded-for_header-value
- uri
- response_code
- http_class_name
- attack_type
- violations
- sub_violations
- sig_names
- sig_ids
- protocol
- severity
- request_status
- request
- support id
- dest_id
- dest_port
Note
It’s crucial to select these items in the order defined above, as this determines what information is populated in F5 ASM alerts to the logging device, and in what order.
Tip
You can bulk select items by holding the control key while selecting the placeholders in the Available items column. However, note that the items will move over alphabetically, and must be reordered using the Up and Down buttons.
Step 3. Complete Logging Profile Fields.

Step 3. Complete Logging Profile Fields.
Step 3. Complete Logging Profile Fields.
- Click Create.
- The new logging profile is created and available from the Logging Profiles screen.

Step 5. Created Logging Profile.
Associating Logging Profiles with Virtual Servers ⫘
In Version 11.3+, logging profiles are not associated with ASM security policies, but with virtual servers hosting the HTTP Class Profiles that are associated with the security policies. This enables more than one logging profile associated with a virtual profile.
To associate a logging profile with a virtual server:
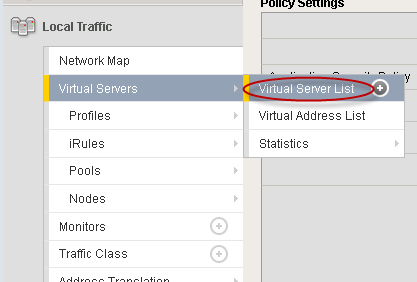
- From the F5 welcome screen, select Local Traffic > Virtual Servers > Virtual Server List.
Step 1. Open Virtual Server List.
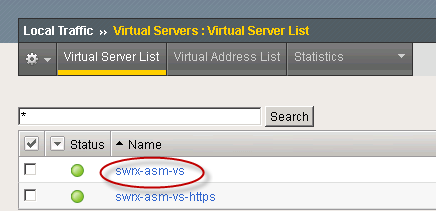
- Select the name of the virtual server you want to associate with the logging profile. The Properties window is displayed.
Step 2. Open Properties.
- Select Security > Policies.

Step 3. Open Policies.
- Under Available, select the logging profile you want to associate with the security policy and move it to the Selected box.

Step 4. Select Profiles.
- Select Update to save these changes.
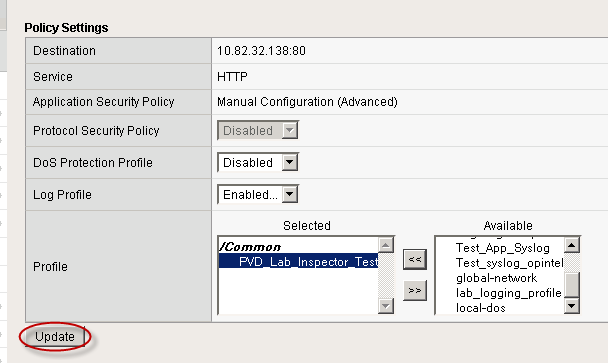
Step 5. Update Changes.
System Logging Configuration ⫘
To configure the system logging:
- From the F5 welcome screen, open System > Logs > Configuration > Remote Logging.
- The Remote Logging Properties window is displayed.
- Complete the following fields:
- Remote IP — The IP address of the XDR Collector
- Remote Port — Enter 601
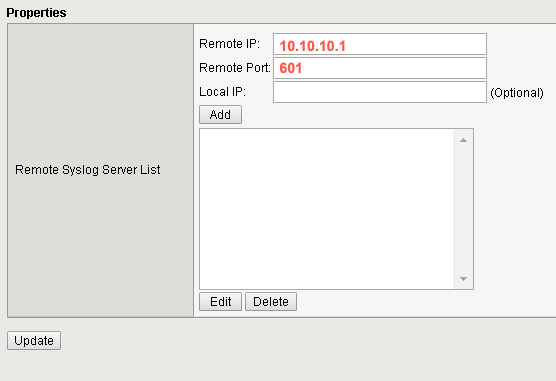
Step 3. Edit Logging Properties.
- Select Add to add the information to the list.
- Select Update to save these changes.
Once these steps are completed, the device is ready to send events to the XDR Collector.
