Cisco FTD Firewall Integration Guide
integrations network cisco firewall
This guide provides configuration instructions for monitoring a Cisco Firepower Threat Defense (FTD) running on a Cisco FXOS Chassis, as well as instructions for creating an eStreamer certificate to retrieve all security event logs from the device.
Prerequisites ⫘
This section details prerequisites for Secureworks to monitor a Cisco FXOS chassis along with an FTD logical device and the associated Firepower Management Center (FMC).
Monitored device: 9300 or 4100 chassis
- The chassis requires a management IP address.
- The customer must be able to login and make changes to the Firepower Chassis Manager (web UI of chassis).
FTD logical device: 9300/4100/2100/5500-X
- The FTD logical device requires its own management IP address.
- The customer must be able to login and make changes to the FMC.
- The FTD logical device must be logging security events to the FMC.
- The customer should be able to view intrusion events and connection events if logging is properly configured in the FMC.
Network Time Protocol (NTP) source
- The FMC, 9300/4100 chassis, and the FTD logical device all should use the same NTP source.
- This guide describes using the Taegis™ XDR Collector as an NTP server, but the customer can use their own if desired.
Connectivity Requirements ⫘
| Source | Destination | Port/Protocol | Reason |
|---|---|---|---|
| XDR Collector (mgmt IP) | FMC Management Interface | TCP/8302 | Intrusion, Flow and File event data via eStreamer |
| FMC Management Interface FTD Logical Device Management interface FXOS Chassis |
XDR Collector (mgmt IP) | UDP/514 | Audit and Firewall logs via Syslog |
Secureworks® Taegis™ XDR Connectivity Requirements
Data Provided from Integration ⫘
| Antivirus | Auth | DHCP | DNS | Encrypt | File | HTTP | Management | Netflow | NIDS | Process | Thirdparty | ||
|---|---|---|---|---|---|---|---|---|---|---|---|---|---|
| Cisco FTD Firewall (Syslog only, see eStreamer via eNCore for NIDS) | D | Y | D | D | Y | D | V |
Y = Normalized | D = Out-of-the-Box Detections | V = Vendor-Specific Detections
Note
XDR detectors are not guaranteed to be triggered, even if a data source's logs are normalized to a schema associated with a given detector. However, you can create Custom Alert Rules to generate alerts based on normalized data from a data source.
Implementation ⫘
FXOS 9300 and 4100 Chassis Configuration ⫘
This section details the tasks required on the 9300 and 4100 Series FXOS chassis. If the device is a 2100 or 5500-X, please skip to FTD Logical Device Configuration.
Configuring Syslog from the FXOS Chassis (Audit Logs) ⫘
Follow the procedure in the vendor's documentation to configure Syslog from the FXOS chassis.
- Log in to the Cisco Firepower Chassis Manager web UI.
- Open the Platform Settings tab.
- Select Syslog from the left-hand navigation.
- Open the Remote Destinations tab.
- Complete the following fields:
- Admin State — Select Enabled
- Level — Select Information
- Hostname/IP Address — Enter the IP address of the XDR Collector
- Facility — Select local7
- Select Save.
- While still within the Syslog section, select the Local Sources tab.
- Enable all three admin states:
- Faults
- Audits
- Events
- Select Save.
Configuring Syslog to be Sent from the FTD Logical Device (Firewall Logs) ⫘
The FTD logical device must be configured from the FMC web UI to forward syslog to the XDR Collector. These syslog messages are related to firewall logs.
Note
These steps presume that there is no existing syslog configuration in the platform settings policy for the FTD logical device(s). If there is, then some of this may already be configured/enabled, and you may only need to add the remote syslog server.
Configuring Logging Setup and Destinations ⫘
- Log in to the FMC web UI.
FMC Web UI
- Navigate to Devices > Platform Settings.
- Select New Policy, or select the pencil icon if editing an existing policy.

Editing a policy
- Select Syslog from the left-hand navigation.
- Select the Logging Setup tab.
- Select Enable Logging.
Note
If the device is in an HA pair, also select Enable Logging on the failover standby unit.
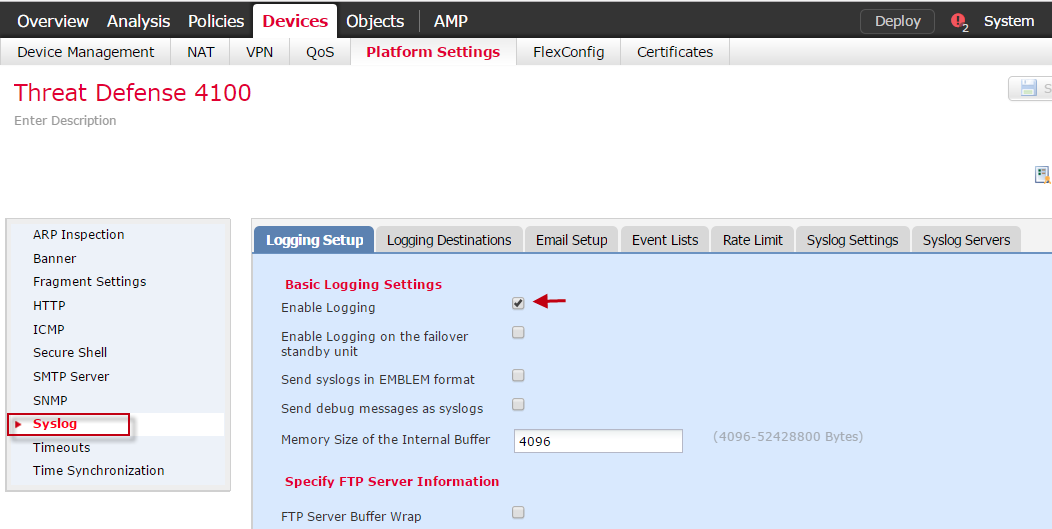
Enable Logging
- Select the Logging Destinations tab.
- Select Add to add logging destinations of the internal buffer.
- In the new pop-up modal, complete the following fields:
- Logging Destination — Select Internal Buffer
- Event Class — Select Filter on Severity
- Severity — Select Informational
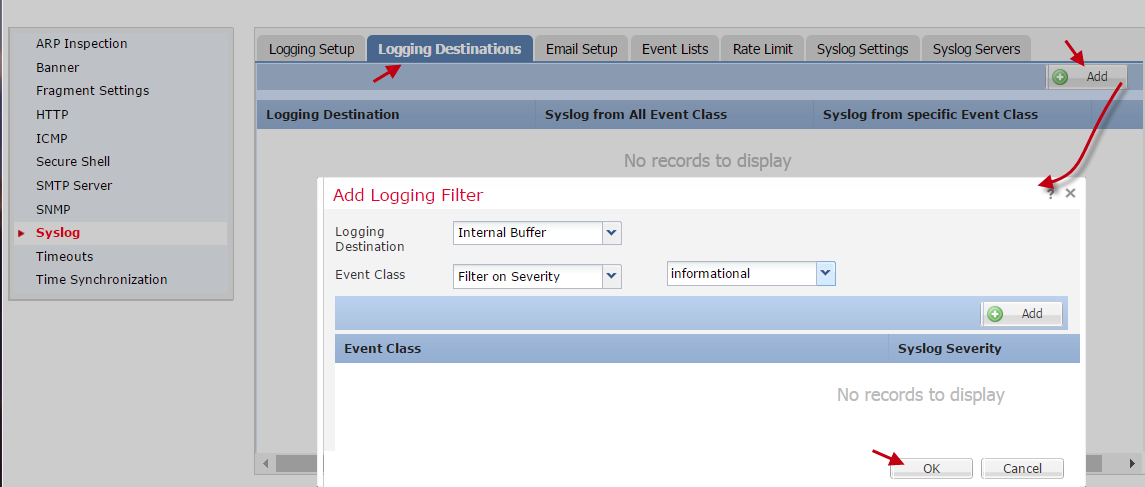
Add Logging Filter for Internal Buffer
- Select OK.
- Select Add again to add logging destinations of the syslog servers.
- In the new pop-up modal, complete the following fields:
- Logging Destination — Select Syslog Servers
- Event Class — Select Filter on Severity
- Severity — Select Informational
- Select OK.
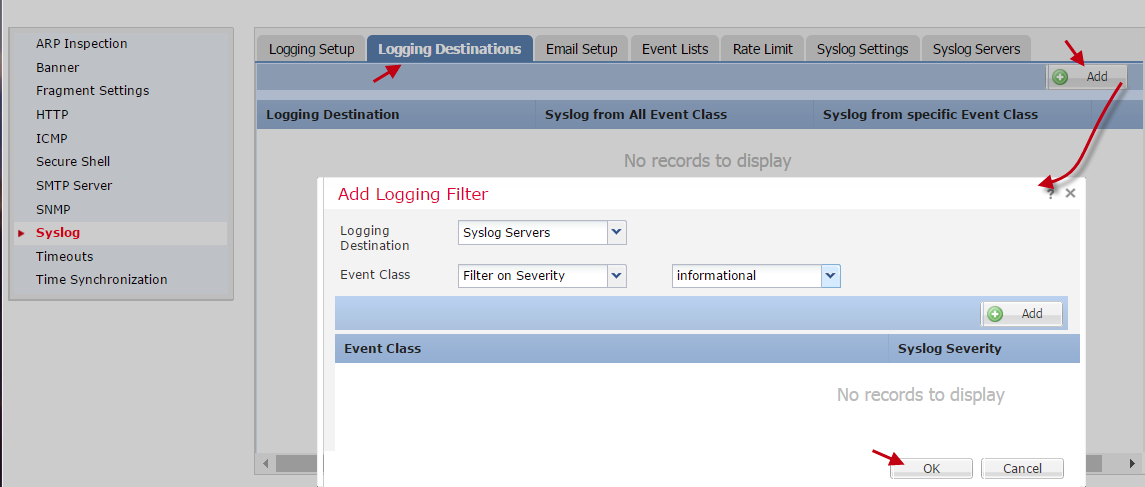
Add Logging Filter for Syslog Servers
Adding syslog servers for Cisco versions 6.3+ ⫘
Note
These steps are only for Cisco versions 6.3 and later.
- Select the Syslog Servers tab.
- Select Add to add a syslog server.
- In the new pop-up modal, complete the following fields:
- IP Address — Enter the IP address of the XDR Collector
- Protocol — Select UDP
- Port — Enter 514
- Reachable By — Select Device Management Interface
- Select OK.
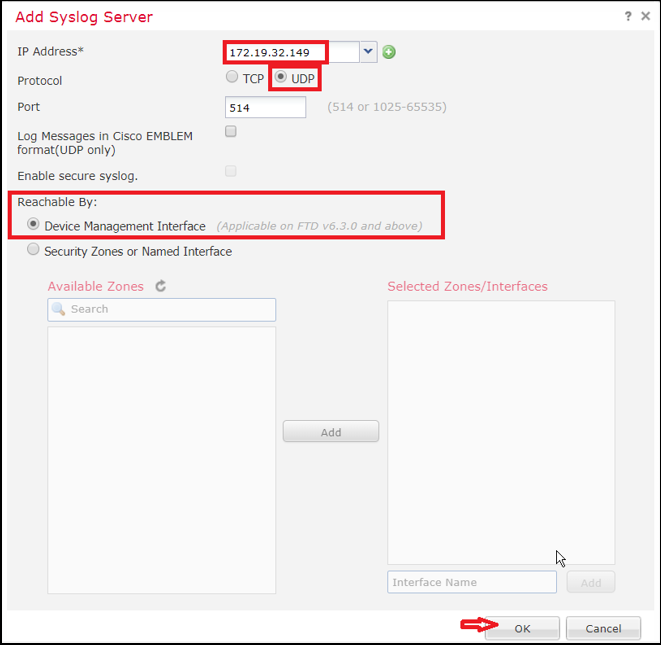
Adding Syslog Servers
Adding syslog servers for Cisco versions pre-6.3 ⫘
Note
These steps are only for Cisco versions earlier than 6.3.
- Select the Syslog Servers tab.
- Select Add to add a syslog server.
- In the new pop-up modal, complete the following fields:
- IP Address — Enter the IP address of the XDR Collector
- Protocol — Select UDP
- Port — Enter 514
- In the Available Zones and Selected Zones/Interfaces section:
- If the firewall is in routed mode, add the Zone through which the XDR Collector is reachable to the Selected Zones/Interfaces area.
- If the firewall is in transparent mode, type in the logical name of the FTD diagnostic interface (by default this is ’diagnostic’) and add it to the Selected Zones/Interfaces area.
Note
If the firewall is in transparent mode, the interface with the logical name ’diagnostic’ needs to have an IP address assigned to it that is in the same subnet as the FTD logical device management IP address. This IP is used by the firewall as the source for syslog firewall logs.
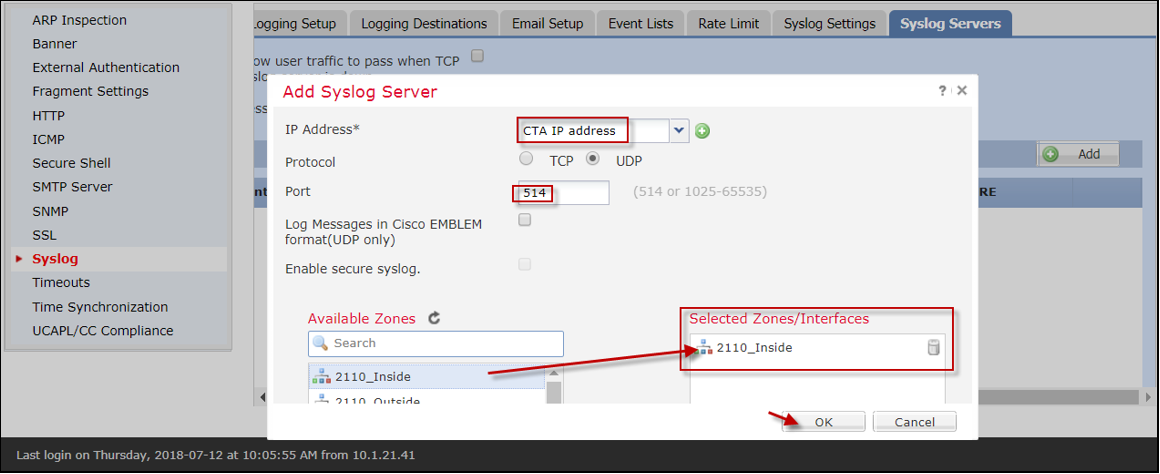
For routed mode
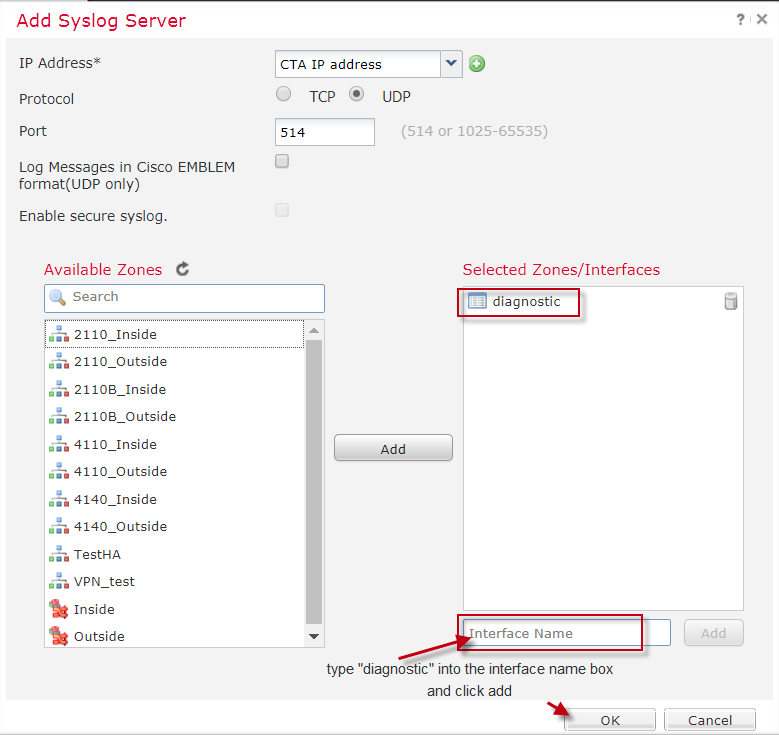
For transparent mode
- Select OK.
- Select the Syslog Settings tab.
- Complete the following fields:
- Enable Timestamp on each Syslog Message — Uncheck this option, as Secureworks does not support timestamps
- Enable Syslog Device ID — Select this option, select User Defined ID from the drop-down menu, and enter FTD-FW in the field
- (Optional) Use the Syslog Message table to alter the default settings for specific syslog messages. You need to configure rules in this table only if you want to change the default settings. For example, you can change the severity assigned to a message or disable the generation of a message.
- Select Save.
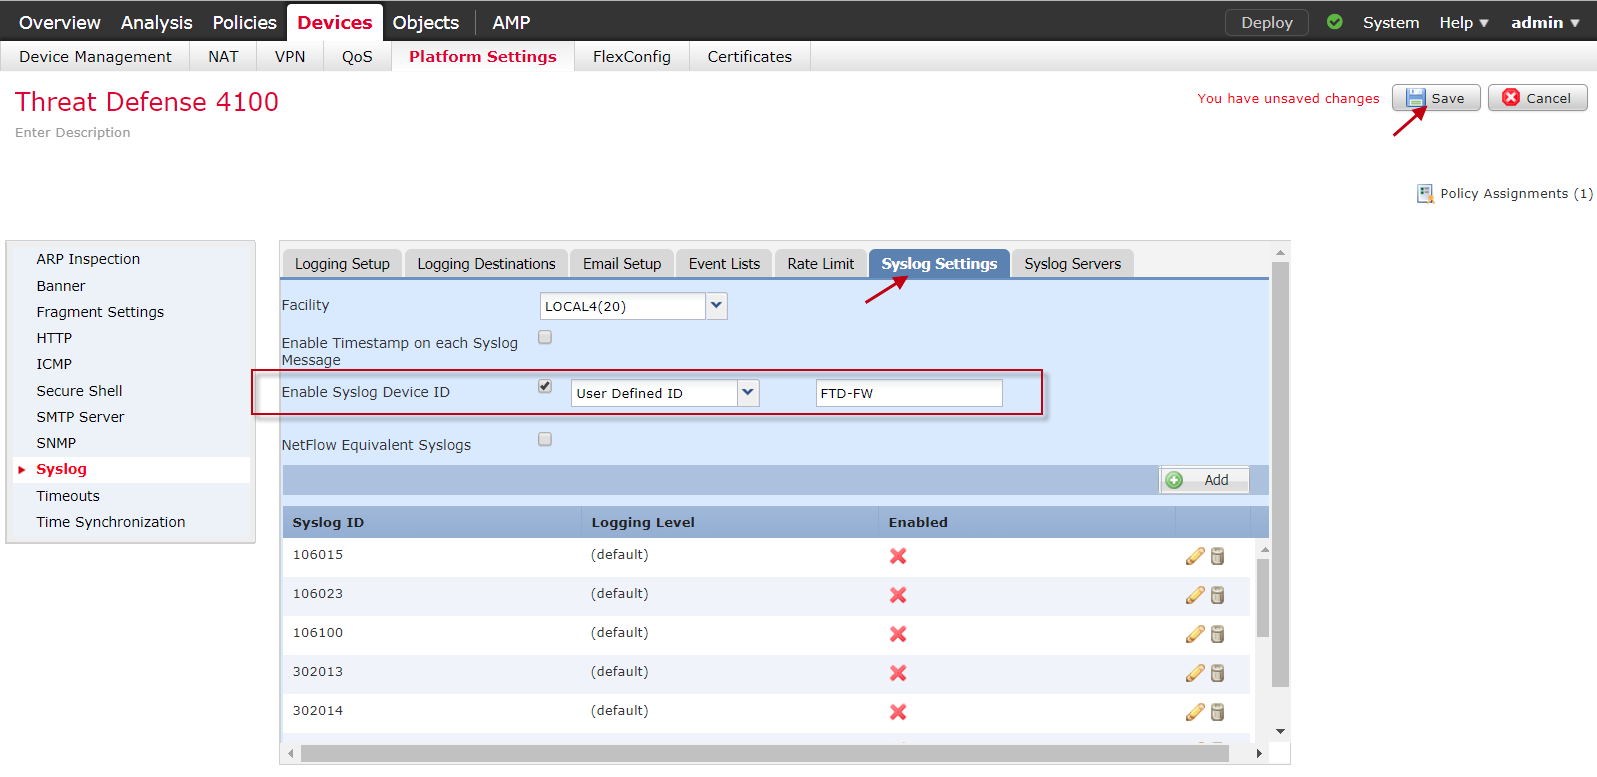
Edit the syslog settings.
FMC Configuration ⫘
This section details the tasks required to configure the Firepower Management Center (FMC).
Configuring Syslog from the FMC (Web UI Audit Logs) ⫘
Audit logs from the FMC can be forwarded to a remote server.
- Log in to the FMC web UI.
- Navigate to System > Configuration.
- Select Audit Log from the left-hand navigation.
- Complete the following fields:
- Send Audit Log to Syslog — Select Enabled
- Host — Enter the IP address of the XDR Collector
- Facility — Select Audit
- Severity — Select INFO
- Tag — Enter SFAUDIT
- Send Audit Log to HTTP Server — Select Disabled
- Select Save.
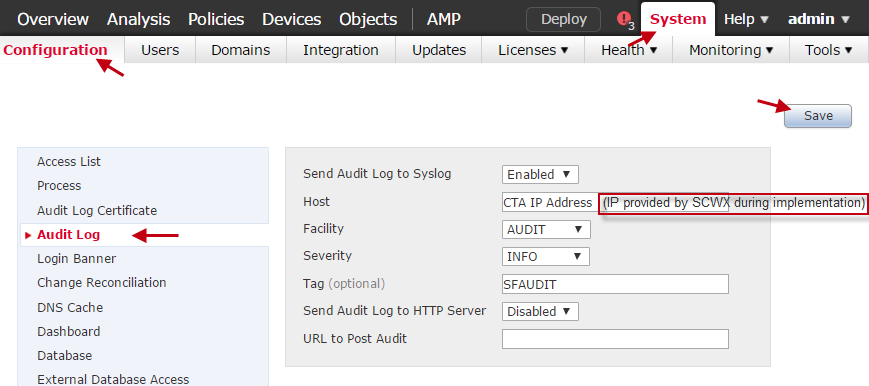
Configuring Syslog from the FMC
Configuring FMC for NTP ⫘
To configure NTP on the FMC:
- Log in to the FMC web UI.
- Go to System > Configuration.
- Select Time Synchronization in the left-hand navigation.
- Complete the following fields:
- Serve Time via NTP — Select Enabled
- Set My Clock — Select Via NTP from... and enter the IP address of a reachable NTP server.
- Select Save.
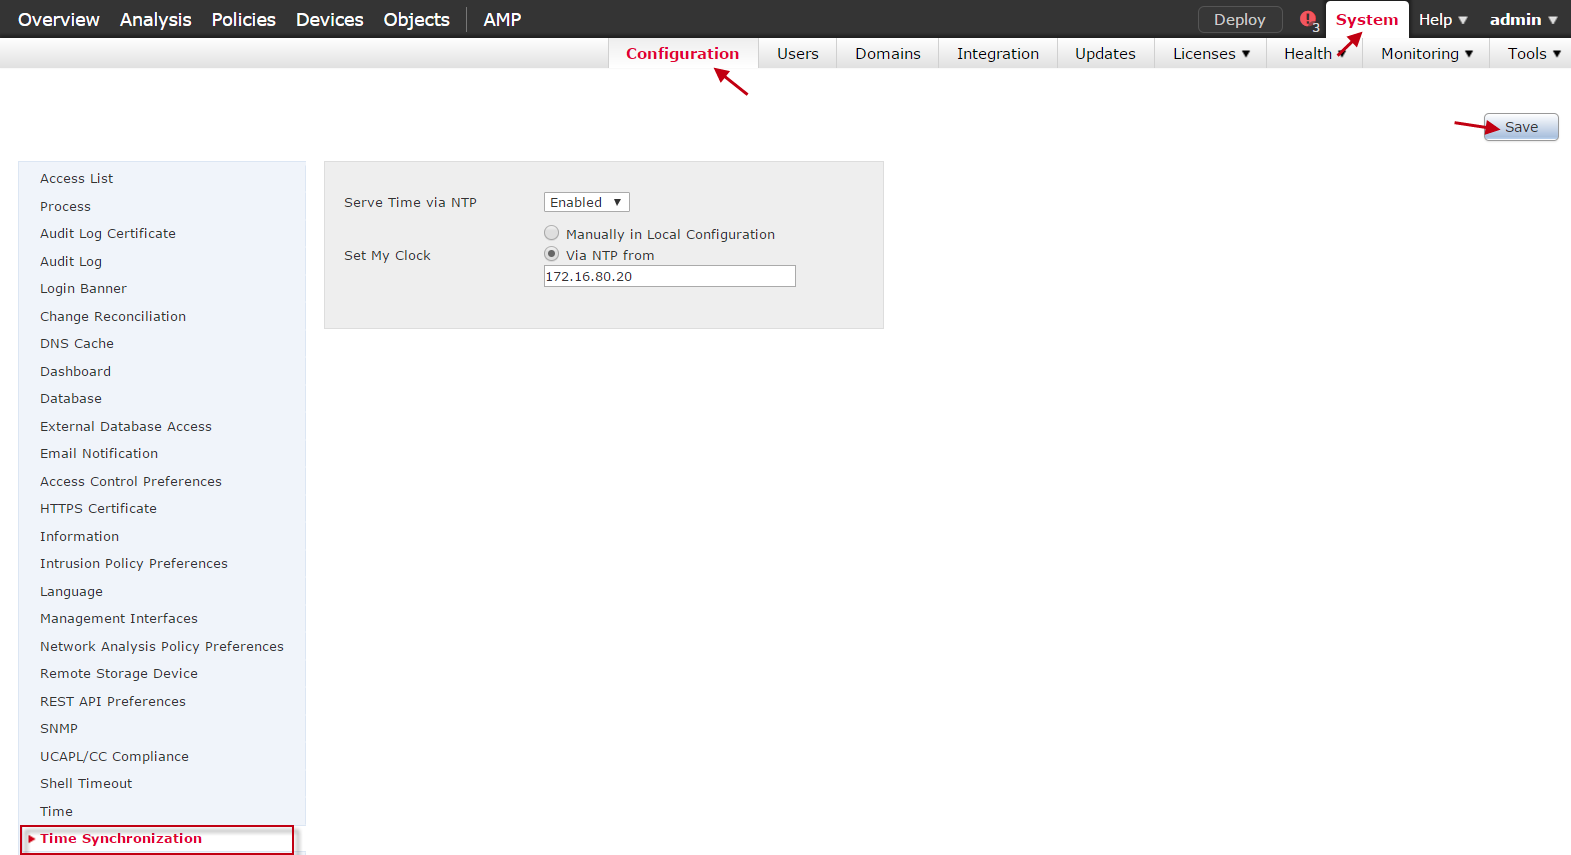
Configuring FMC for NTP
Create eStreamer Certificate for XDR Collector (Security Events) ⫘
eStreamer is the API that is used to retrieve all security events/logs from the FMC to the XDR Collector. It requires a certificate that is installed on the XDR Collector to secure the connection. For further information, see the Add the eStreamer App topic.
Note
If the device is part of an HA pair, you must provision a second XDR Collector, repeat these steps in both FMCs, and then use the secondary eStreamer certificate to add a discrete eStreamer app instance to the second XDR Collector.
- Log in to the FMC web UI.
- Go to System > Integration > eStreamer.
- Select all necessary event types from the eStreamer Event Configuration list, then click Save.
Note
Discovery Events and Connection Events result in many events.
- Select Create Client.
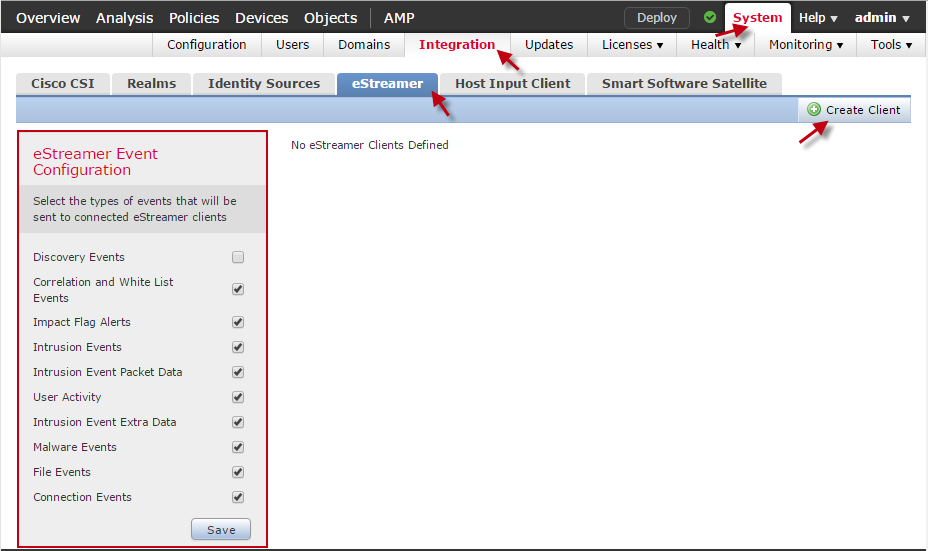
Create Client.
- In the Hostname field, enter the IP address of the XDR Collector that this eStreamer certificate will be imported into.
- Create a Password.
Note
Be sure to securely document this password, as it will be needed when the certificate is imported into the XDR Collector.
- Select Save.

Enter Hostname and Password.
- Back on the eStreamer tab, select the Download icon next to the client you just created.

Download eStreamer certificate.
- Use the eStreamer certificate to add the eStreamer app to the XDR Collector. For further information, see the Add the eStreamer App topic. If the device is part of an HA pair, you must provision a second XDR Collector, repeat these steps in both FMCs, and then use the secondary eStreamer certificate to add a discrete eStreamer app instance to the second XDR Collector.
Deploying Policies in the FMC ⫘
All affected FTD logical devices must be deployed to push any changes that you have made.
- Log in to the FMC web UI.
- Select Deploy from the top navigation bar.
- In the new pop-up modal, select the device you wish to apply the policy to, then click Deploy.
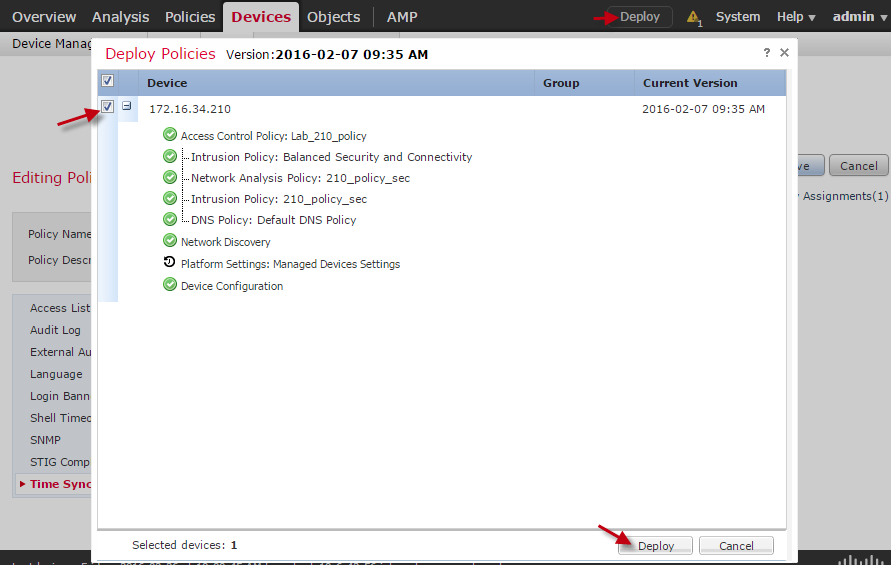
Deploy policy.
- A pop-up displays in the upper right corner with deployment status updates. Select the yellow alert icon next to the Deploy button to view the status of deployments, health, and tasks.
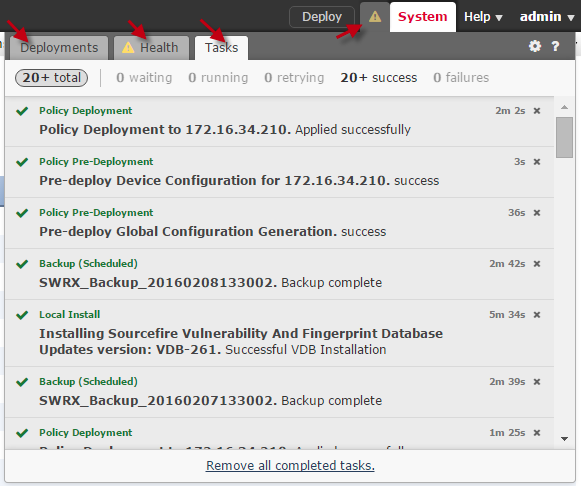
Status updates and alerts.

Status updates and alerts.
