Symantec (Blue Coat) ProxySG Integration Guide
integrations network symantec blue coat
Symantec ProxySG (formerly known as Blue Coat ProxySG) devices must be configured to send logs via syslog to the Taegis™ XDR Collector. Proxy logs are filtered and correlated in real time for various security event observations, including correlation of denied traffic logs and outbound traffic to known malicious IP addresses or domains addresses, including known Advanced Persistent Threat (APT) target endpoints being monitored by the Secureworks Counter Threat Unit (CTU).
Follow the instructions below to configure the logging.
Connectivity Requirements ⫘
| Source | Destination | Port/Protocol |
|---|---|---|
| Symantec (Blue Coat) ProxySG | XDR Collector (mgmt IP) | TCP/601 |
Data Provided from Integration ⫘
| Antivirus | Auth | DHCP | DNS | Encrypt | File | HTTP | Management | Netflow | NIDS | Process | Thirdparty | ||
|---|---|---|---|---|---|---|---|---|---|---|---|---|---|
| Symantec (Blue Coat) ProxySG WebProxy | D |
Y = Normalized | D = Out-of-the-Box Detections | V = Vendor-Specific Detections
Note
XDR detectors are not guaranteed to be triggered, even if a data source's logs are normalized to a schema associated with a given detector. However, you can create Custom Alert Rules to generate alerts based on normalized data from a data source.
Logging Configuration Instructions ⫘
To configure Symantec (Blue Coat) ProxySG to send a syslog feed for both the event logs and proxy access logs to the XDR Collector:
- Open Configuration > Access Logging > Logs.
- Select New to create a new Access Log file.
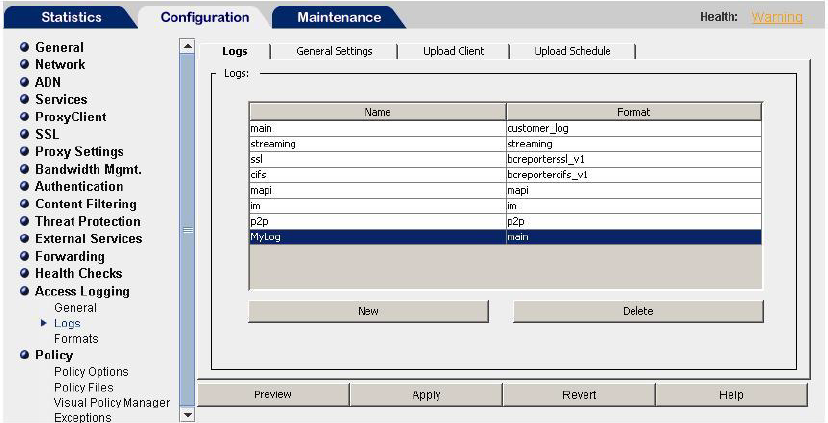
Create a New Access Log File.
-
Navigate to Configuration→Access Logging→Formats and complete the following fields:
- Format Name — Enter a name for the format
- Multiple-valued header policy — Select Log last header from the drop-down list
- W3C Extended Log File Format (ELFF) — Select this option, then enter the following string, or see the note below about custom formats:
x-bluecoat-placeholder date time time-taken c-ip c-port cs-username cs-auth-group s-supplier-name s-supplier-ip x-exception-id sc-filter-result cs-categories cs(Referer) sc-status s-action cs-method rs(Content-Type) cs-uri-scheme cs-host cs-uri-port cs-uri-path cs-uri-query cs-uri-extension cs(User-Agent) r-ip r-port sc-bytes cs-bytes x-virus-id x-bluecoat-application-name x-bluecoat-application-operation x-bluecoat-transaction-uuid x-icap-reqmod-header(X-ICAP-Metadata) x-icap-respmod-header(X-ICAP-Metadata) s-ip cs(X-Forwarded-For) s-sitename
Tip
If the format string is not accepted, such as due to an invalid character, copy and paste the string above into a notepad first, then copy that into the field.
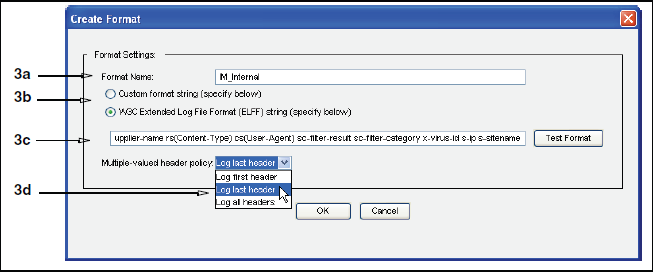
Complete Access Logging Format Fields
- Click OK. If the procedure above does not complete successfully, complete the following steps to create a Web Access Layer Policy. Otherwise, skip to Step 15.
Configuring a Web Access Layer Policy ⫘
Note
In our example we define a Web Access Layer policy with an Override Access Log Field object that uses the x-bluecoat-placeholder field. If you choose another field to override, then update the variable in the W3C log format and configure your policy using that field.
Add the Policy to the Proxy ⫘
-
Use the Blue Coat Management Console Visual Policy Manager (VPM) on the proxy to create the new policy.
-
In the VPM, select Policy from the menu at top, then select Add Web Access Layer. The Web Access Layer is the broadest layer and most likely to gather data and is recommended as the layer for this policy. An Add New Layer text box prompts you to name the layer; this example names the layer TDR.
-
Click OK. After a moment the Visual Policy Manager window displays the new layer.
-
Choose Edit→New Rule. Leave Any as the rule for the Source, Destination, Service, and Time objects. For the Action object, right-click Deny and choose Set. A Set Action Object window opens.
- In the Show drop-down list at top, select Override Access Log Field Objects. The window changes to show defined Override Access Log Field Objects.
-
Select New then select Override Access Log Field Objects from the drop-down list. An Add Access Log Field Override Object window opens; insert the identifier string into this window. This allows Secureworks® Taegis™ XDR to identify the log type.
-
Make any needed test specifications:
- Provide a name that makes sense for the rule name or accept the default name.
- For Log Name, select [ALL]. This ensures the field is altered in all three supported log formats.
- For Field Name, select the field you have identified to override, in this example,
x-bluecoat-placeholder. - Choose Rewrite value to and enter this exact text: ProxySG_v1.
-
When you have finished your changes, click OK. The Add Access Log Field Override Object window closes.
-
Click OK. The Set Action Object window closes.
-
In the Visual Policy Manager window, click Install Policy. The View Generated CPL and Current SG Appliance VPM Policy Files windows display. You can close the windows after verifying the generated CPL (content policy language). Close the Visual Policy Manager by clicking the window close icon.
-
Return to Configuration > Access Logging > Logs.
- Open the Access Log you created in step 2, and select the tab Upload Client.
- Under Client Type, select Custom Client, then click Settings.
- Enter the XDR Collector IP address for the Host and 601 for the Port.
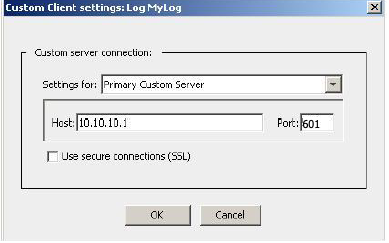
Enter the Host and Port
- Click OK.
- Under Save the log file as, select text file.
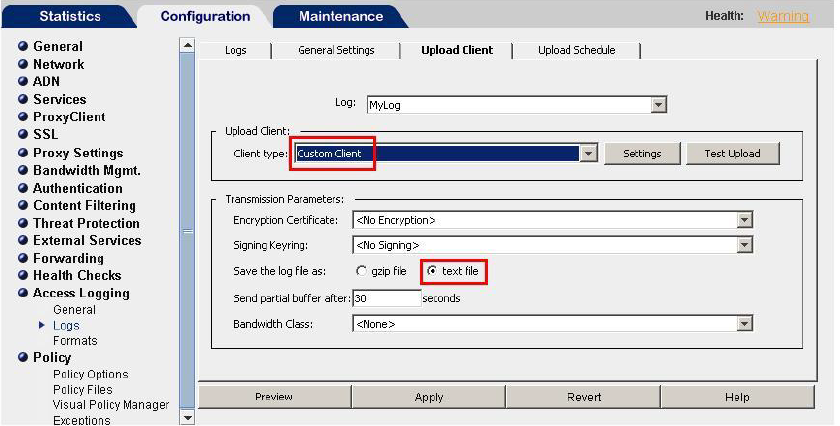
Select the Client Type and Log File Type
- For the same Access Log, select the tab Upload Schedule.
- Under Upload the access log, select continuously.
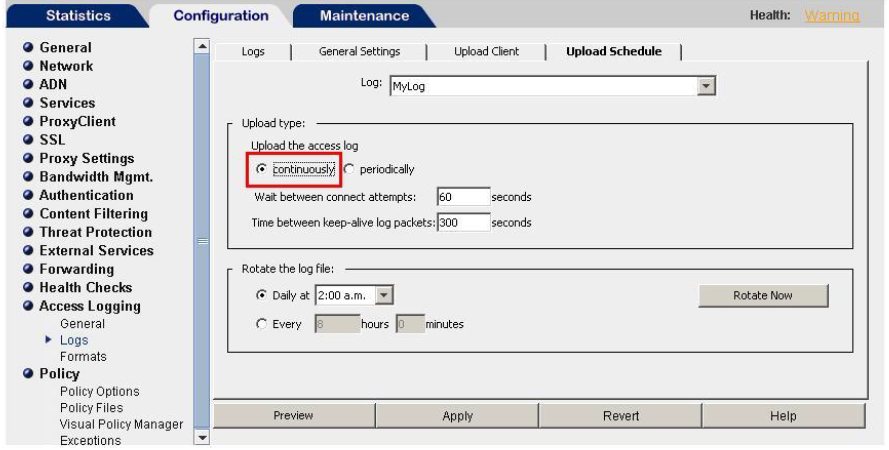
Select the Access Log Upload
- Click Apply.
- Open Visual Policy Manager. In a Web Access Layer, set the Action to Modify Access Logging.
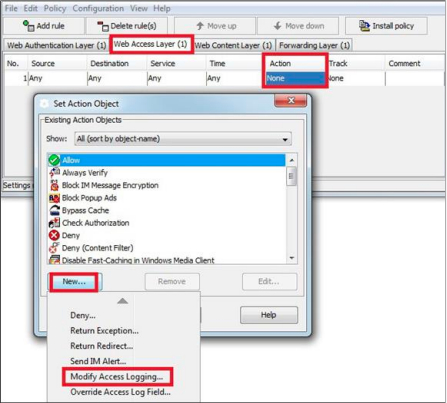
Modify Access Logging
- In the Access Logging object, enable logging to your new access log.
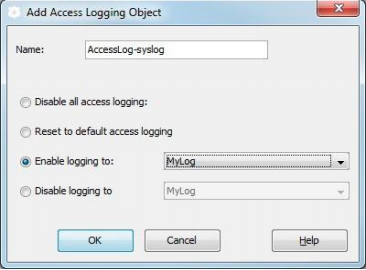
Enable Logging
